Thursday, March 13, 2014

New Oven!


Happy, happy, joy, joy! 

My old Hamilton Beach Countertop Oven was in pretty bad shape. I used to have to use a flashlight to see inside and at times do the forbidden... open the oven to take a peek. Actually, the oven itself still worked (after 5 plus years). It was the cord that was about to go. The plug area was corroded and I was beginning to feel like it was a hazard. So, out it went! 

Goodbye oven, you served me well! 

The other day I was very fortunate to find a newer version of the same brand of countertop oven for only $40... such a deal! It was the last one on the shelf and perhaps that was why it was so cheap. Yippee! 


So without hesitation, I immediately fired it up and experimented by baking up a batch of these light and fluffy breakfast goodies. 

Note: If you happen to purchase a Hamilton Beach Countertop Oven, too, it's a good idea to make sure to run it at the highest temperature for one hour. It's also a good idea to have the windows open and have a fan on as well. The factory sealant will burn off and your creations won't be ruined. After that initial procedure, you're ready for culinary paradise. 

Breakfast Blondies

2 cups 365 brand High Fiber Morning O's (or your favorite bran cereal)
1 cup buttermilk
1/2 cup Extra Light Olive Oil (I use Philipo Berrio) 
1/2 cup light brown sugar (packed)
2 tsp. pure vanilla extract
2 eggs
1 cup peanut butter (or switch out with your favorite nut butter)
1 tsp salt, 
2 tsp. baking soda
1 1/3 cups A.P. flour
1 cup semi-sweet chocolate chips

Preheat oven to 350 degrees

In a food processor or blender, whiz cereal until it resembles coarse flour. Pour into large mixing bowl. Add buttermilk. Let soak for 15 minutes. Add olive oil, light brown sugar, vanilla extract, eggs, and peanut butter. Mix well.

Add in salt, baking soda and flour, chocolate chips. Using a rubber spatula, gently fold in all ingredients just until flour is absorbed. Batter will be thick. Do not over mix. 

Pour into baking pan lined with parchment paper (it forms a sling for easier removal  after cooking).
Spread and smooth out with an offset spatula. Trim parchment if it is too high around edges. 


Bake for 40 minutes or until light golden brown. Try not to over bake. 


Cool 10 minutes and then carefully lift up parchment paper and slide onto cooling rack. Cut into squares and serve immediately. Store any leftovers in airtight container. Enjoy! 


Thursday, March 6, 2014

Lambsagna?


Lambsagna?

Yes, lambsagna. LOL. It's a word my husband made up when I served him lasagna prepared with ground lamb instead of ground beef. Honestly, it was a truly flavorful dish very similar to the lasagna roll-ups only in casserole form. What you'll need is:


Ingredients:

1 16 oz. package of lasagna noodles (cooked, drained and cooled)
2 lbs. sauteed ground lamb
1 lb. ricotta and 1 egg (mixed together with pinch of salt and pepper)
bread crumbs
1 cup grated Pecorino Romano cheese (I adore Locatelli brand)
2 cups shredded mozzarella cheese
2 cups baby spinach (toss into sauteed lamb -- spinach leaves will wilt)
olive oil
2 cups of your favorite tomato sauce

Method:

Preheat oven to 350 degrees

Prepare a casserole dish with non-stick cooking spray. Add 1 cup tomato sauce thinned with a few splashes of water (to keep sauce from burning). 

Arrange a layer of pre-boiled noodles. Top first layer of noodles with sauteed ground lamb/spinach mixture. Sprinkle on 1/2 of bread crumbs, and top with a sprinkling of grated Locatelli. 


Next, arrange a second layer of cooked noodles, top with ricotta, egg, salt and pepper mixture. Smooth with a spatula and then sprinkle with 1/2 the mozz cheese.


Place a third layer of prepared noodles and top with remaining sauteed lamb/spinach mixture, bread crumbs, and more of the grated Pecorino Romano cheese.

Place the forth and final layer of pasta into casserole and cover completely with remaining sauce, mozzarella and grated Peccorino Romano cheeses. Drizzle lightly with olive oil and cover with foil sprayed with non-stick spray.


Bake for 1 hour. During the last 10 minutes of cooking time, remove foil and let cheese bubble and brown. Serve piping hot with crusty bread and a tossed salad. Enjoy!

Friday, February 14, 2014

Valentine's Day Brownies


Happy Valentine's Day everyone! 

Today for Valentine's Day, my son thought he'd bring his grandmother a special treat along with a homemade card. To say the least, she enjoyed it very much. These brownies are super easy and taste so much better then the typical boxed brownie mix. Bake up a batch today for your family or special someone. :)


Valentine's Day Brownies

Preheat oven to 350 degrees

2 eggs lightly beaten 
1 cup brown sugar packed
1 1/4 cup extra light tasting olive oil (Filippo Berio is a nice brand)
1 cup packed light brown sugar
1 tsp. vinegar

In a large bowl, mix above ingredients until well combined. 

Add: 

1 1/2 cup all purpose white flour
3/4 cup cocoa powder
1tbsp. baking powder
1 tsp. baking soda
1/2 tsp salt

Combine just until absorbed. Be careful not to over mix. Keep in mind batter will be very thick.

Prepare a heart shaped tin generously with non-stick cooking spray. Scoop even amounts of batter into each heart. Bake 15 to 20 minutes or until a toothpick inserted into batter comes out almost clean. Do not over bake. Makes 6.

Enjoy!


Wednesday, February 5, 2014

Happy 2014 Everyone!


Hope you all had an awesome holiday season! We had a fantastic Christmas and New Years! 

I dedicate this to Steven Long Mitchell whose encouraging tweet made this entry possible. I was losing motivation to keep up the blog until his tweet. One never knows how much a little encouragement can do for someone. 

You see, the television show The Pretender has been a huge part of our lives over the years. We actually visited The Centre for summer vacation 2002. So, thanks Steven! 


It's been a while since my last blog entry, so I've decided to upload some photos to check out from the last couple of months. Enjoy!


Thursday, November 14, 2013

Mini Pizzas and Bread Loaf


The other day we were seriously craving pizza. Since payday was still a few days away, I found myself making up a batch from the very versatile Bread Dough and Focaccia recipe. It is very simple to make and you'll wind up saving yourself a bunch of dough (pun intended) that you would normally spend on take-out. 

Quick and Easy Mini Pizzas and Bread Loaf

Yield: 16 minis plus 1 loaf of bread

Tomato Sauce (your favorite jar or homemade)
Shredded Mozzarella Cheese
Pecorino Romano
Italian Seasoning
Olive Oil
Kosher Salt
Freshly Ground Pepper
1/4 Stick Melted Butter

Note: See Bread dough recipe for more in depth instructions. 

When the bowl of dough is completely risen, set aside one quarter and place into a greased loaf pan. Cover with a kitchen towel and let sit in a warm area until it doubles in size (at least an hour). Uncover and make a slice down the center with a sharp knife and brush with melted butter.

Bake until internal temperature reaches 200 degrees. Remove from pan to cool.

Using remainder of dough, divide into sixteen pieces. Flatten into round disks. Drizzle olive oil generously onto cookies sheets. Place four discs at a time on each cookie sheet. Ladle with tomato sauce, add cheeses, Italian seasoning, salt, pepper & a drizzle of olive oil. I also like to brush the edges of the pizzas with a little extra olive oil so they will bake up nice and golden brown. If you wish, this would be a good time to add on your favorite toppings like fresh veggies, dollops of ricotta, fresh mozzarella slices, pepperoni, fresh basil leaves and so on. The possibilities are endless! 


Bake in 400 degree preheated oven on bottom rack. Use a spatula to peek under the pizzas to check on the bottom crust. Once bottom crusts are nicely browned, move pan onto upper rack until cheeses are melted, bubbly and golden brown. Enjoy!


Tuesday, October 29, 2013

Bread Dough and Focaccia


There's nothing better on a fall afternoon than a slice of homemade bread slathered in butter. I remember in my childhood, my mother would get up real early on the weekends, and let me help her gather the ingredients together to bake up some crusty luscious bread. As we waited for it to bake, the fragrant aroma of sumptuous loaves would waft up through the air and assault our senses with the warm fuzzies. She would tell me stories of how she and her mommy, Mama Connie, would bake bread as well. Her mother would drizzle olive oil on the warm bread and top it off with some crushed oregano. Her mother used to serve the bread with a side of Sicilian orange salad which was basically an orange sectioned off into a bowl drizzled with olive oil, crushed oregano and sprinkled with Kosher salt. The combination of sweet and salty was divine. I know this because my mom would make it for me and now I make it for my children. Don't knock it until you give it a taste. 

Today, I thought I'd share two recipes. This bread dough recipe makes enough dough to bake up two loaves of bread as well as two 12 inch round pans of focaccia bread. Oh and feel free though to serve the orange salad on the side. Hope these recipes are as comforting to you as they are to me and my family. Enjoy!
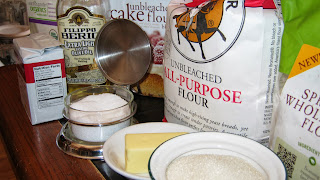


Bread Dough
Scant tablespoon yeast
1 1/2 cups milk
1 cup boiling water 
1/2 stick butter cut into slices
3 tbsp sugar
3 tbsp olive oil
1 1/2 tsp. kosher salt
2 cups cake flour
1 cup sprouted whole wheat flour (or your favorite whole grain flour)
6 cups A.P. flour
1 egg (beaten)


I use a KitchenAid mixer with the dough hook attachment. My mixer happens to be a hand-me-down from my mom. If you do not happen to own one of those beauties, this recipe can be done by hand. Just throw all the ingredients into the largest bowl you have on hand. 

The only tricky part of this recipe is to try not to kill the yeast. Make sure to mix the hot water and milk until the mixture is luke warm. 

I use the baby bottle method -- don't laugh yet... it works every time.
Simply sprinkle a few drops of the milk/boiling water mixture on the inside of your wrist. If it doesn't burn you, it's perfect!

If you happen to have a food thermometer... 95 degrees works even better. 

You may set aside any leftover liquid for later. Once you've established the correct temperature, add the butter slices and sugar. Stir until you notice the yeast is completely dissolved and the butter has melted. Let sit so the yeast can colonize or multiply, approx. 10 minutes. 

Begin adding the cake flour and the sprouted wheat flour. Mix until incorporated. Next, add A.P. flour (one cup at a time). Add any remaining milk/boiled water little by little as needed until dough becomes smooth. If dough is too sticky, add more flour. If dough is too dry, add more liquid. You may end up with a half cup of leftover flour in which you may use during the kneading process. 


When you see the dough begin to come together and separate from the mixing bowl it is ready to knead. 

Let gravity do the work for you by turning bowl over onto lightly floured surface. By using the heals of your hands, press dough, turn dough about 45 degrees, fold over, and knead again. Knead for probably a good ten minutes. 


Cover with plastic wrap that has been sprayed with non-stick spray. Place a kitchen towel over the bowl and let sit in the warmest place of your home. 

When dough is doubled, usually 1 to 2 hours... separate into thirds. Set aside 1/3 for later. Punch down the rest and divide into two loaf shapes and place each one into well greased 9" X 5" loaf pans. 

Cover again with the same plastic wrap you used before (if you wish to conserve), place the towel over the loaf pans and let sit once again until dough doubles or triples in size and takes up the entire pan. 

Preheat oven to 450 degrees

Brush the beaten egg over the top of each pan of bread dough. If you wish, you could sprinkle on some sesame or poppy seeds. 

Poppies! Poppies!

Anyway, place loaf pans in preheated oven and bake at 450 degrees for the first five minutes.


After five minutes, lower the oven to 375 degrees. Bake until bread is golden brown with an internal temperature of approximately 200 degrees. My mom taught me her traditional way of knowing how the bread loaf was done. I did it her way for years before I owned a food thermometer. I guess I was too lazy to purchase one at the time. Ha! Anyway, I remember she would tell me to remove the loaf of bread out of the pan and knock on the underside a few times. If it sounded  hollow, it was done. However, I definitely prefer the high tech food thermometer method to check for doneness.

Sometimes, during last few minutes of baking time I remove the bread from the pans and place directly on the oven racks. This enables the loaves to be golden brown all over. 

If you haven't already removed the loaves from the pans, do so after taking them out of the oven. Place bread on cooling racks. Try to refrain from cutting off a slice for at least 15 minutes. It ensures the hot dough won't lay in your belly and cause a bellyache. Well, that's what Mama Connie and my mother used to say anyway. LOL.


If the aroma hasn't driven your smell-buds crazy by now, dig in by carefully slicing with a serrated bread knife using a gentle sawing motion. 

Some serving suggestions: 

Top with your favorite things in life... like butter, olive oil, herbs, cream cheese, goat cheese, jams etc. Also, this bread is perfect for dipping into a small bowl of olive oil with roasted garlic, herbs, and grated cheese. Oh and the next day it is wonderful as a toasting bread or even great with sandwiches... like grilled cheese. It's wonderful for a panini as well! 


********************************


Focaccia
3 scallions (cut on the diagonal into thin strips)
Tuscan and Italian Seasoning (or your favorite spices)
2 cups grated mozzarella cheese
1 cup Pecorino Romano cheese (my favorite is Locatelli)
extra virgin olive oil

Divide above ingredients in two.

Use remaining third of the dough to form two equal 4 inch round ball shapes. Place ball shapes on 12 inch pizza pans that have been well-oiled. Flatten out with your hands. Work the dough out to the edges of the pan, trying to be patient because it has a tendency to snap back. When the gluten relaxes, it will eventually stay put. 


Drizzle olive oil over flattened out dough. Add cheeses, scallion slices, and spices. Bake at 400 degrees on the bottom rack until the bottom of the crust is golden brown, then move up to the top shelf and bake until top is golden. 


Note: I often use a rounded piece of foil to prevent toppings from burning while I'm waiting for bottom crust to brown. 

When cooked, transfer to a cooling rack. After a few moments, you can move it onto a cutting board and slice into rectangles.